Powerful nutrient compounds in beets help to reduce the risk of heart disease, birth defects, and some cancers.

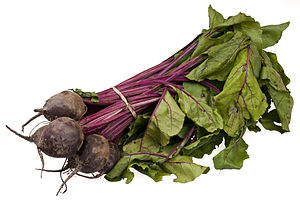
The beetroot in North America is a colorful root vegetable that includes several cultivated varieties of beet (Beta vulgaris) grown for their edible taproots and greens, food coloring, and as a medicinal plant. The usually deep purple roots of beetroot can be eaten boiled, grilled, or roasted, cold as a salad after being cooked and dressed with oil and vinegar, or raw and shredded, either alone or combined with salad vegetables. Beet leaves are edible, nutritious, and can be prepared the same way as Swiss chard.

History of beets (beetroot): 

  • The wild beet, the ancestor of today’s common beet, is thought to have originated during prehistoric times in North Africa and grown wild along Mediterranean, Asian and European seashores.
  • The beet sugar industry traces its origins to ancient Babylon, Egypt, and Greece, where sugar beets were first cultivated. The tap root was not known until the 2nd or 3rd Century AD. The plant was grown from 2000 BC for its leaves and used by Greeks and Romans as ‘Chard’ or ‘Spinach.’ In these early times, people ate just the beet greens, not the roots.
  • The ancient Romans were one of the first civilizations to cultivate beets to use their roots as food. Tribes that invaded Rome were responsible for spreading beets throughout northern Europe, where they were initially used for animal fodder and later for human consumption, becoming more popular in the 16th century.
  • In the mid-1700’s, the German chemist Andreas Margraff discovered that both white and red beetroot contained sucrose, indistinguishable from that produced from sugar cane.
  • Although beet leaves have been eaten since before written history, the root was generally used medicinally and did not become a popular food until French chefs recognized it’s potential in the 1800’s. While the root was eaten in France and Italy as a vegetable, roasted whole, in England it was used as cattle fodder during the 18th Century.
  • During the Napoleonic Wars, France was deprived of sugar by the English Fleet and Napoleon encouraged research in the use of sugar beet.
  • Beets became more popular in the 19th century, when it was discovered that they were a concentrated source of sugar. In 1801, the first sugar beet factory was built at Cunern in Silesia, Poland. When access to sugar cane was restricted by the British, Napoleon decreed that beets be used as the primary source of sugar. Around this time, beets were also first brought to the United States, where they now flourish.
  • The first successful commercial factory to extract sugar from beets in the USA was constructed by E. H. Dyer at Alvarado (now known as Union City), California in 1879.
  • Today the leading commercial producers of beets include the United States, Russian Federation, France, Poland, France and Germany.
  • Approximately 2/3 of commercial beet crops end up canned.

(Section through taproot)

The “beetroot” is the taproot portion of a beet plant. In North America the beetroot is also called a table beet, garden beet, red or golden beet, or beet.

Botanical name: Beets are botanically known as Beta vulgaris (derived from the Greek letter beta, because the swollen, turnip-like root resembles a Greek B). 

Common names for beets:

  • Garden beet, beetroot, chard, Swiss chard, sugar beet, blood turnip, spinach beet, biet, juurikas, betteraves, rübe, biatais, barbabietola, beterraba, remolacha, betor.
  • Commonly known as the beet in the United States. Outside the United States, beets are usually referred to as beetroot in English-speaking countries.

Beet varieties: 

  • The most common garden beet is deep ruby-red in color.
  • Yellow, white, and candy-striped (with red and white concentric circles) beets are available in specialty markets.
How are beets used today? 
  • Betanin, obtained from the roots, is used industrially as red food colorant to improve the color and flavor of tomato paste, sauces, desserts, jams and jellies, ice cream, sweets, breakfast cereals, etc.
  • Sugar beets are used to make table sugar.
  • Beetroot dye is sometimes used in ink.

When are fresh beets in season? 

  • In North America, fresh beets are available from June through October (mid-summer through early fall). Some markets import fresh beets from opposing climates and sell them year-round. Beets are also readily available canned.
  • Costco now sells USDA organic, cooked beets in 1-pound plastic containers.

When buying fresh beets:

  • To insure freshness, select beets with leaf stems still attached and small leaves that are not yellow or tattered. The greens reflect how fresh the beets are: if they look moist and fresh, the beets will be too. Avoid beets that appear dry, cracked, shriveled, or have scales or spots.
  • Choose small, firm beets with deep maroon coloring, unblemished skin, and bright green leaves that are not wilted. The taproot should still be attached.
  • Avoid large beets with a hairy taproot. The tiny roots (hair) are an indication of age and toughness.
  • Most beets that come to market will be 1-1/2 to 2 inches in diameter. Larger beets tend to have a tough, woody center. Smaller beets will be sweeter and more tender.
  • The leaves are edible and nutritious and can be prepared the same way as Swiss chard (also known as spinach beet).
  • Try to purchase fresh, organic beets whenever possible (95% of sugar beets in the United States are genetically modified).
  • Fresh beets are generally inexpensive, but must be washed and boiled. As an alternative, you can use packaged ones in plastic bags which are already cooked and peeled. They make preparation of beet recipes quite easy and can be served as an emergency appetizer for guests.

Beet Storage: 

  • To store beets, trim their leaves leaving 1-2 inches of stem on the beets as soon as you get home, since the leaves will steal moisture from the beet root. Do not trim the tail (taproot). Store the beets and leaves separately in open plastic bags in your refrigerator crisper. While the greens may keep only 1-2 days, the root bulbs should last for at least 1 week. Use the leaves within two days.
  • Cooked or canned beets may be refrigerated up to 1 week.
  • Fresh cooked beets may be frozen whole or in cut pieces up to 10 months. Be sure to peel before freezing in airtight containers or baggies, leaving no air in the container.

To cook beets:

  • Cut off beet tops, not too close to the bulb, leaving about 2 inches of stem on them. Wash beets well. Keep sound, tender leaves, washing them well.
  • Place in a pot of cold water to cover. Bring to a boil on high heat.
  • Cook beet bulbs in boiling, salted water for 20 minutes or until tender: about 20-30 minutes for small beets, 30-40 minutes for medium size beets. Cook leaves separately in salted water until tender.
  • Plunge the beets in cold water and peel outer skin as soon as cool enough to handle, removing stem and tap root (the skin usually slips off easily). Wear kitchen gloves to prevent your hands from becoming stained.
  • Cut into slices or cubes. At this point the beets are ready to use in a recipe.

Steaming: A healthier way to preserve the nutrients and flavor of beets:

  • Cook beets lightly, since their concentration of phytonutrients, such as betalains, is reduced by heat.
  • Steam beets for 15 minutes to maximize their nutrition and flavor: Fill the bottom of a steamer with 2 inches of water and bring to a rapid boil. Add beets, cover, and steam for 15 minutes. Beets are cooked when you can easily insert a fork or knife tip into the beet.
  • Peel beets on a cutting board and rub the skin off with a paper towel. Wear kitchen gloves to prevent your hands from becoming stained.
  • Transfer to a bowl and serve with vinaigrette or other ingredients.
  • Beets’ color can be modified during cooking. Adding an acidic ingredient such as lemon juice or vinegar will brighten the color while an alkaline substance such as baking soda will often cause them to turn a deeper purple. Salt will blunt beets’ color, so add only at the end of cooking if needed.

To freeze beets:

  • Prepare, cook, and peel beets as described above. (Do not freeze raw beets, as they’ ll be mushy once thawed.)
  • Cut into slices or cubes.
  • Package into freezer bag or plastic container, leaving ½-inch headspace. Seal and freeze.
  • You can also freeze the beets first in a single layer on a cookie sheet, and then transfer the frozen beets into the freezer bag or container.

Beet Tips:

  • Although beets can be eaten raw, they are generally boiled, baked, steamed, fried, grilled or otherwise cooked before eating.
  • To retain nutrients and color, boil, bake or steam without peeling first. Allow cold water to flow over hot, cooked beets, so you don’t burn your fingers. The skin will easily rub off under cold running water after they are cooked.
  • To remove beet juice from fingers, rub with wet salt and lemon juice and then wash with soap and water. For cutting boards and plastic containers, use a bleach solution.
  • If you eat beets or drink beet juice, be aware that your urine and stools may soon appear reddish. This is normal. The red colour compound in beets, betanin, is not broken down in the body, and in higher concentrations may temporarily cause your urine and stool to become reddish. In the case of urine this is called beeturia. This effect may cause you concern initially, since it resembles hematuria (blood in the urine) or blood in the stool, but is completely harmless and will subside once the food is out of your system.

Nutrients and phytochemicals in beets:

  • Very low in calories (1/2 cup of cooked beets has only 37 calories) and fat, and high in fiber, vitamins, minerals, and unique plant-derived antioxidants.
  • Raw beets are an excellent source of folate (a vitamin which significantly reduces the risk of birth defects), a good source of B-complex vitamins such as pantothenic acid (B5) and pyridoxine (B6), and minerals such as manganese, potassium, copper, magnesium, phosphorus, vitamin C, and iron.
  • While raw beets are an excellent source of folate, extensive cooking may significantly reduce the level.
  • The root is a rich source of the phytochemical compound, glycine betaine: Betaines may help to reduce the concentration of homocysteine (a homolog of the naturally occurring amino acid cysteine) in the blood. High circulating levels of homocysteine may be harmful to blood vessels and contribute to the development of heart disease, stroke, or peripheral vascular disease.
  • Beet greens provide about 20 nutrients (listed from greatest to lowest concentration): vitamin K, vitamin A, vitamin C, copper, potassium, manganese, vitamin B2, magnesium, vitamin E, fiber, calcium, iron, vitamin B1, vitamin B6, pantothenic acid, phosphorus, protein, zinc, folate and vitamin B3.  Just 1 cup of beet greens contains 774.4% of your daily intake of vitamin K and 61.2% intake of vitamin A!

Nutrition Breakdown (5)
Per four cooked, boiled, drained beets (each approximately 2 inches in diameter)
Calories: 88
Fat:  0.36 g
Beta-carotene: 42 mcg
Fiber: 4 g = 16 %* DRI
Folate: 160 mcg = 40 % DRI
Iron: 1.58 mg = 8.8 % DRI
Potassium: 610 mg = 13 % DRI*

*Percentages are for women 31-50 years old who are not pregnant

Health benefits of beets: Powerful nutrient compounds in beets help to reduce the risk of heart disease, birth defects, and certain cancers, especially colon cancer.

  • Antioxidant: The pigments that give beets their rich colors are called betalains. Betalains include two basic types: betacyanins and betaxanthinsBetacyanins are the red-violet pigments that predominate in dark red, crimson, or purple colored beets. Betaxanthins are yellowish pigments that predominate in yellow beets. Many betalains function both as antioxidants and anti-inflammatory molecules. In addition to beets, rhubarb, chard, amaranth, prickly pear cactus, and Nopal cactus are examples of foods that contain betalains. What’s most striking about beets is the unusual mix of antioxidants that they contain. Certain vegetables are rich in antioxidant carotenoids, in particular, beta-carotene; among all well-studied carotenoids, none is more commonly occurring in vegetables than beta-carotene. When it comes to antioxidant phytonutrients that give most red vegetables their distinct color, anthocyanins predominate (Red cabbage gets it vibrant red color primarily from anthocyanins.). Beets demonstrate their antioxidant uniqueness by getting their red color primarily from betalain antioxidant pigments (and not primarily from anthocyanins). Coupled with their status as a very good source of the antioxidant manganese and a good source of the antioxidant vitamin C, the unique phytonutrients in beets provide antioxidant support in a different way than other antioxidant-rich vegetables.
  • Anti-inflammatory: Many of the unique phytonutrients present in beets function as anti-inflammatory compounds. Several types of heart disease, including atherosclerosis, are characterized by chronic inflammation. For this reason, beets have been studied within the context of heart disease and Type 2 diabetes, another health problem associated with chronic inflammation. In addition to their unusual betalain and carotenoid phytonutrients, beets are also a source of betaine. Betaine is a key body nutrient made from the B-complex vitamin, choline. (Specifically, betaine is simply choline to which three methyl groups have been attached.) Choline is a key vitamin that helps regulate inflammation in the cardiovascular system, and adequate choline is important for preventing unwanted build-up of homocysteine. Elevated levels of homocysteine are associated with unwanted inflammation and risk of cardiovascular problems like atherosclerosis. But betaine may be even more important in regulation of our inflammatory status as its presence in the diet has been associated with lower levels of several inflammatory markers, including C reactive protein, interleukin-6, and tumor necrosis factor alpha. As a group, the anti-inflammatory molecules found in beets may eventually be shown to provide cardiovascular benefits in large-scale human studies, as well as anti-inflammatory benefits for other body systems.
  • Circulatory: Some research has shown that beet juice (about 2 cups daily) may increase stamina, help you exercise longer, improve blood flow, and lower blood pressure. Why? Beets are rich in natural chemicals called nitrates. Through a chain reaction, your body converts nitrates into nitric oxide, which improves blood flow and blood pressure.*
  • Detoxification: Betalin pigments in beets have repeatedly been shown to support the body’s detoxification process, by neutralizing toxins and making them sufficiently water-soluble for excretion in the urine.
  • Anti-cancer: The combination of antioxidant and anti-inflammatory molecules in beets makes this food a highly-likely candidate for risk reduction of many cancer types. Lab studies on human tumor cells have confirmed this possibility for colon, stomach, nerve, lung, breast, prostate and testicular cancers. Eventually, large-scale human studies may show the risk-reducing effect of dietary beet intake for many of these cancers.
  • Fiber: While many people tend to lump all food fiber into one single category called “dietary fiber,” there is evidence to suggest that all dietary fiber is not the same. Beet fiber (along with carrot fiber) are two specific types of food fiber that may provide special health benefits, particularly with respect to health of our digestive tract (including prevention of colon cancer) and cardiovascular system. The fiber found in abundance in beetroots reduces the time the stool spends in the intestines, thereby limiting the colon’s exposure to potential carcinogens. Also the green leafy tops of beets are edible and high in fiber, so don’t throw them away — they can be cooked like spinach. Some beet fiber benefits may be due to pectin polysaccharides that significantly contribute to the total fiber content.
  • Beets are rich in betacyanin, a phytochemical responsible for their intense purple color and colon cancer fighting properties: Studies indicate that betacyanin is highly effective at reducing cancer risk, especially colon cancer. To maximize beets’ cancer-fighting properties, cook them only lightly. Research suggests their anti-cancer activity is reduced by heat.

What about sugar and oxalates in beets?

  • The “sugar beet” is a specific type of beet that is rich in sucrose and has been used as a source of refined table sugar for a few hundred years. However, beets sold in grocery stores are not as sweet, since they contain much less sugar. Even sugar beets do not contain much glucose.
  • Beet greens provide more minerals, vitamins, and fiber than the root (except for folate vitamin), yet are very low in calories, fat, and sugar.
  • The root of a beet is relatively high in sugar, consisting of about 75% water, 20% sugar, and 5% pulp (1). The exact percentage of sugar in a beet can vary between 12-21%, depending on the cultivar and growing conditions. Beet sugar is in the form of sucrose, a disaccharide made of one molecule of fructose and one molecule of glucose.
  • All varieties of beets are high in fiber: About 28 % of beet dietary fiber is soluble and the remainder is insoluble (1 cup of raw beets provides about 15 % of the recommended amount of daily fiber for most adults). High-fiber foods tend to have a beneficial impact on blood glucose levels, by moderating blood glucose levels and preventing insulin spikes.
  • Although beets are considered a medium-high glycemic index (GI) food, they actually have a low glycemic load: The GI measures how quickly a carbohydrate-containing food raises blood glucose and ranges from 0 to 100. Foods are ranked based on how they compare to a reference food, either glucose or white bread. A food with a high GI raises blood glucose more than a food with a medium or low GI. The higher the GI, the less favorable a food is for diabetics. The GI of beets is 64. However, beets have a low glycemic load rating of 5. The glycemic load measures the actual amount of carbohydrates in a particular food. Beets do not contain many carbohydrates per serving, a significant proportion of their carbohydrates is indigestible dietary fiber, and meal portions are usually small, about 1/2 cup. In moderation, beets are an appropriate vegetable for diabetics and others who monitor their blood glucose levels.
  • Since beets are high in nutrients, phytochemicals, folate, potassium, manganese, and fiber, they may be included in a diabetic diet occasionally. How much to consume and what effect it will have on one’s blood glucose will vary and need to be monitored. A diabetic person can enjoy beets in moderation, just like potatoes and bananas, but should count the carbohydrate intake from beets.
  • Smaller or younger beets are a better choice than fully grown beets to control the sugar you ingest. Steaming or roasting them is the best way to have them. Avoid overcooking beets, as this will increase their glycemic index.
  • Since beet greens are rich in oxalates, individuals with already existing and untreated kidney or gallbladder problems may want to avoid eating beet greens.
  • I would not recommend drinking beet juice often. One should always choose a whole vegetable or fruit over it’s corresponding juice. Juice is more quickly absorbed by the digestive system than a whole vegetable or fruit and directly adds glucose into your bloodstream. Eating the vegetable not only provides fiber, but also takes longer to digest and convert beetroot to glucose (6).

*Cured foods such as bacon, ham, and hot dogs are known to be high in sodium nitrite preservatives which can be converted during digestion into nitrosamines, known cancer-causing compounds. Beets, radishes, and spinach contain naturally-occurring nitrates which are converted to nitrites and nitric oxide during digestion. These naturally-occurring nitrates are not harmful and are very safe when eaten with the antioxidants and other phytonutrients that beets, radishes, and spinach provide. The more dangerous nitrites added to bacon, hot dogs, and cured meats as preservatives should be avoided.

References:
  1. “Agribusiness Handbooks.” Volume 4: Sugar Beets/White Sugar. 1999.
  2. “Beet or Beetroot for Diabetes.” Diet Health Club. (Source: www.diethealthclub.com/diabetic-diet/beet.html) 01/15/12.
  3. “Beetroot.” Wikipedia. (Source: en.wikipedia.org/wiki/Beetroot) November 2014.
  4. “Beets.” Fresh Food Network. (Source: www.freshfn.com/beets/).
  5. “Beets: The World’s Healthiest Foods.” Wholefoods.org. (Source: www.whfoods.com/genpage.php?tname=foodspice&dbid=49) 2014.
  6. “Can Nutrients in Beets Help With Type 2 Diabetes?” Joslin Communications. Joslin Diabetes Center. (Source: blog.joslin.org/2014/01/4718/) 01/08/14.
  7. Dietary Reference Intakes (DRI): based on National Academy of Sciences’ Dietary Reference Intakes, 1997-2004.
  8. “Eat Whole Fruits, Not Juice, to Lower Your Risk of Type 2 Diabetes.” www.dianesays.com. 11/01/13.
  9. “Environmental Working Group’s (EWG’s) 2014 Shopper’s Guide to Avoiding Genetically Engineered Foods.” Dianesays.com. 05/09/14.
  10. “Folic Acid: The Vitamin That Helps Prevent Birth Defects.” Information for a Healthy New York. New York State Department of Health. (Source: https://www.health.ny.gov/publications/1335/) April 2007.
  11. “Guide to Colon Cancer Prevention: Screening tests such as colonoscopy can cut the risk dramatically. Consumer Reports.org. March 2012. This article was originally published in the December 2011 issue of Consumer Reports on Health under the headline “Stopping a Treatable Cancer.” (Source: www.consumerreports.org/cro/…/guide-to-colon-cancer-prevention/).
  12. (Source: http://www.healwithfood.org/colorectalcancer/foods.php#ixzz3JZD3xdSW).
  13. Kapadia, GJ; Azuine, MA; Rao, GS; Arai, T; Iida, A; Tokuda, H. “Cytotoxic effect of the red beetroot (Beta vulgaris L.) extract compared to doxorubicin (Adriamycin) in the human prostate (PC-3) and breast (MCF-7) cancer cell lines.” Anticancer Agents Med Chem. 2011 Mar; 11(3):280-4.(Source: www.ncbi.nlm.nih.gov/pubmed/21434853).
  14. “Twelve Foods Reducing Colorectal Cancer.” Gastrointestinal Specialists, Inc. Contact information: (804) 285-8206/ info@gastrova.com (Source: www.gastrova.com/patient…/12-foods-reducing-colorectal-cancer/). 2013.

{ Comments on this entry are closed }
The words “herb” and “spice” are often used interchangeably. However, there are distinct differences between the two, depending on what part of the plant is used.


What is the difference between herbs and spices? 

  • Herbs: Culinary herbs are leafy portions of a plant, whether dried or fresh (Examples: basil, bay leaves, cilantro, parsley, rosemary, and thyme).
  • Spices: Spices are harvested from any other portion of the plant and typically dried. Popular spices come from berries (peppercorns), flower buds (cloves), roots (ginger), seeds (nutmeg), and the stamen of flowers (saffron).
  • Some plants yield both an herb and a spice: Cilantro is the leafy herb of the same plant that provides the popular spice coriander seed. Dill weed (an herb) and dill seed (a spice) also come from the same plant.

Add herbs and spices to enhance the natural flavor of food, not hide it. How much you add, and when, can influence the outcome of your meal:

  • Ground herbs and spices release their flavor and aroma more easily than whole. Add them near the end of cooking time, to minimize the risk of cooking away their flavor.
  • Whole spices like cloves and cumin and certain herbs, such as bay leaves, release their flavor more slowly, so add them at the start of cooking. Tie them in cheesecloth or place in a tea ball for easy removal.
  • Fresh leafy herbs, such as basil, dill, or parsley, should be added in the last five minutes of cooking.
  • More robust fresh herbs like rosemary can be added earlier in the cooking period.
  • Crumble dried herbs, like basil, oregano, or parsley, just before use to release their flavor.
  • To reduce the heat of hot peppers, remove the seeds.
  • For salad dressings, fruit dishes, or other no-cook foods, add herbs and spices several hours before serving, so flavors can develop and blend. Add seasonings to vinegar first and let stand before adding the oil.
  • Fresh herbs can be added to salads, soups, stews, and sauces to enrich the meal’s color, fragrance, nutrition, and flavor.

A quick reference chart to help you choose herbs and spices for specific dishes 

Beans (dried) cumin, cayenne, chili, parsley, pepper, sage, savory, thyme
Beef basil, bay, chili, cilantro, curry, cumin, garlic, marjoram, mustard, oregano, parsley, pepper, rosemary, sage, savory, tarragon, thyme
Breads anise, basil, caraway, cardamom, cinnamon, coriander, cumin, dill, garlic, lemon peel, orange peel, oregano, poppy seeds, rosemary, saffron, sage, thyme
Cheese basil, caraway, celery seed, chervil, chili, chives, coriander, cumin, dill, garlic, horseradish, lemon peel, marjoram, mint, mustard, nutmeg, paprika, parsley, pepper, sage, tarragon, thyme
Chicken allspice, basil, bay, cinnamon, curry, dill, fennel, garlic, ginger lemongrass, mustard, paprika, rosemary, saffron, sage, savory, tarragon, thyme
Corn chili, curry, dill, marjoram, parsley, savory, thyme
Eggs basil, chervil, chili, chives, curry, dill, fennel, ginger, lemon peel, marjoram, oregano, paprika, parsley, pepper, sage, tarragon, thyme
Fish anise, basil, bay, cayenne, celery seed, chives, curry, dill fennel, garlic, ginger, lemon peel, mustard, oregano, parsley, rosemary, thyme, saffron, sage, savory, tarragon, marjoram
Fruits allspice, anise, cardamom, cinnamon, cloves, coriander, ginger, mint
Lamb basil, bay, cinnamon, coriander, cumin, curry, dill, garlic, marjoram, mint, mustard, oregano, parsley, rosemary, savory, tarragon, thyme
Potatoes basil, caraway, celery seed, chervil, chives, coriander, dill, marjoram, oregano, paprika, parsley, poppy seed, rosemary, tarragon, thyme
Salad Dressings basil, celery seed, chives, dill, fennel, garlic, horseradish, marjoram, mustard, oregano, paprika, parsley, pepper, rosemary, saffron, tarragon, thyme
Salads basil, caraway, chives, dill, garlic, lemon peel, lovage, marjoram, mint, oregano, parsley, rosemary, tarragon, thyme
Soups basil, bay, chervil, chili, chives, cumin, dill, fennel, garlic, marjoram, parsley, pepper, rosemary, sage, savory, thyme
Sweets allspice, angelica, anise, cardamom, cinnamon, cloves, fennel, ginger, lemon peel, mace, nutmeg, mint, orange peel, rosemary
Tomatoes basil, bay , celery seed, cinnamon, chili, curry, dill, fennel, garlic, ginger, gumbo file, lemongrass,


Amount to add when no recipe is available:

  • Begin with 1/4 teaspoon per pound of meat, for each pint (2 cups) of sauce or soup, or for a serving for four. Adjust as necessary. For cayenne and garlic powder, start with 1/8 teaspoon.
  • Since the fiery flavor of chili peppers can intensify during cooking, add them in very small increments and taste test frequently. 

To substitute dried herbs for fresh: Use 1/3 teaspoon powdered or 1 teaspoon crushed for every tablespoon chopped fresh herbs.

To reconstitute dried herbs and develop their flavors: Soak them in some liquid to be used in your recipe (water, broth, lemon juice, milk, olive oil, vinegar, or wine) for 10 minutes to 1 hour before using.

Before using herbs and spices, note the expiration date on the jar, if available, and use your senses to determine freshness:

  • Color: Green, leafy herbs will often fade as they age. Red spices such as paprika, red pepper and chili powder will turn brown in color.
  • Aroma: Place a small amount in your palm and gently rub with your thumb. The aroma should be rich, full, and immediate. If not, it’s probably lost potency. For whole spices, break or crush to release their full fragrance. Then scrape with a knife or grater. 
  • If in doubt, throw it out: Herbs and spices are some of the least expensive ingredients in any entree. If their their freshness is questionable, it may be best to replace them.

To prolong the freshness of herbs and spices:

  • Buy quality products with a long shelf life: They will provide the highest concentration of volatile-oils and retain their flavor longer.
  • Protect green herbs from direct sunlight exposure.
  • Fresh-cut herbs: Wrap in a paper towel, place in a resealable plastic bag, and store in the refrigerator until they are to be used.
  • Store in a cool, dry place, away from direct light, heat, or humidity: Airtight glass jars closed tightly after each use are best for dried herbs and spices.
  • Don’t shake dried herbs or spices from their respective jars over a boiling pot: Moisture from steam may diminish the potency of spices or herbs remaining in the jar. Pour a small amount into your hand or a ramekin, then add to pot.

Guideline for how long to keep dried herbs and spices:

  • Ground spices: 2-3 years
  • Whole spices: 3-4 years
  • Herbs: 1-3 years
  • Seasoning blends: 1-2 years
  • Extracts: 4 years

Whole foods versus supplements:

  • Whole foods are the best sources of vitamins, minerals, and other plant compounds that help you stay healthy and fight disease.
  • Use herbs and spices in their natural form. Taking them as a supplement may reduce their effectiveness and increase the risk of side effects.
  • If you plan to take any herbs as supplements, consult your health care provider first. 

References:

  1. “A quick reference chart to help you choose for herbs and spices for specific dishes.” Herb and Spice Chart-Recipes for Home Cooking. (Source: www.homecooking.about.com/library/archive/blmisc2.htmC).
  2. Source: http://www.spiceislands.com/spices_and_herbs_education/adding_herbs_and_spices#sthash.ptHAuQvm.dpuf


{ Comments on this entry are closed }

More Halloween Treats and Crafts

by Diane, M.P.H, M.S.

IMG_0463

The following Halloween crafts are fun, inexpensive, easy for children to make themselves, and take just minutes to put together! They also make delightful Halloween decorations, invitations, party favors, and hand-outs for trick-or-treaters. 

Lollipop Ghosts:

Lollipop Ghost

Preparation: Less than 3 minutes per ghost

Materials:

  • One round Tootsie Roll Pop or round sucker Lollipop for each ghost
  • One or two white Kleenex tissues (thicker tissues are easier to work with) or a square piece of towel paper or white fabric size 9″x9″ cut using pinking sheers
  • Pair of plastic movable eyes (6mm or 7mm wiggle eyes) or 1 fine-point pen or black marker for eyes and mouth
  • Glue for plastic wiggle eyes
  • One pipe cleaner (sometimes labeled as “Chenille Stems” at craft stores) or a 6″ piece of yarn or thin ribbon (any color will do, but orange or black are more traditional for Halloween)
  • Scissors

Directions:

  1. Place a tissue down flat on your work surface. If using two tissues, lay the second one on top of the first at an angle, so that the corners of both tissues can all be seen.
  2. Place your round lollipop in the middle of the tissues and gently gather the tissues around the head of the lollipop.
  3. Twist a pipe cleaner or tie a small piece of yarn or thin ribbon just below the head of the lollipop, to make the ghost’s head. After twisting pipe cleaner snugly, shape it’s loose ends to resemble ghost’s arms. Make a bow with the yarn or ribbon, or just tie it and cut off the long ends.
  4. If using plastic eyes, add a dab of glue to the back of eye and gently press into place. If you prefer to draw all the facial features, just use a black marker to dab on two circle eyes and a larger circle shape for the mouth.
  5. Use the ghost as an invitation by tying on an invite to the ribbon or as a craft for kids to make during a Halloween party, hang as decorations, or stack in a big bowl to give out on Halloween night.
IMG_0616
For Halloween Lollipop variations, change the tissue or fabric color to create bats, monsters, Jack-o-Lanterns, or Frankenstein monsters:
  • Bats: Use black fabric to make bats by adding black paper wings. Wrap lollipop in black fabric. Glue on eyeballs purchased at any craft store. Tie with a ribbon. Fold a piece of black construction paper in half. Cut through both layers of paper to create the shape of a wing. Leave the center attached and folded. Open the wing up and use glue to attach its midsection to the back of the lollipop bat.
  • Monsters: Use black fabric with glow in the dark markers or fabric glue to make scary monsters. Draw in a mean face, scars, fangs, or anything scary you can think of. If using fabric glue, make sure it sits for couple hours to dry.
  • Jack-o-Lantern: Use orange fabric to make a jack-o-lantern. Wrap lollipop in orange fabric. Tie with a festive Halloween ribbon. Draw in 2 triangle eyes and mouth.
  • Frankenstein: Use green fabric to make Frankenstein monsters. Wrap lollipop in the green fabric. Tie with a ribbon, rope, or electrical wire. If using wire, make the wire at the end stick up in funny directions. Draw on the face and don’t forget the scars. Use any small bolts and glue on each side for ears.

Lollipop Spiders:

Tootsie Roll spider.

Preparation: Less than 5 minutes per spider

Materials:

  • Lollipop of your choice (Tootsie Roll Pops work best)
  • 4 pipe cleaners per spider (black or colors of your choice)
  • 7mm googly eyes
  • Glue

Directions:

  1. Evenly gather and hold all four pipe cleaners and center them on the top of the lollipop stick. Twist them around the stick.
  2. Take lollipop and wrap the 4 pipe cleaners around the bottom of the wrapper, leaving a bit of wrapper color exposed in front for the spider’s mouth.
  3. Bend each of the pipe cleaners to make them resemble spider legs.
  4. Glue on either 2 paper eyes you have made, or 2 store bought plastic eyes, to the upper part of the spider” body above where you wrapped the pipe cleaners around the stem.

IMG_0461

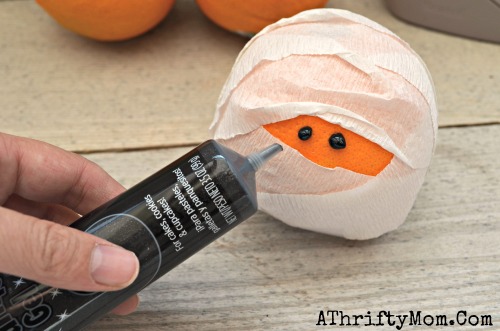
Fruit Mummies (This recipe can be done with apples, clementines, grapefruits, oranges, pears, pineapple, pomegranate, etc.):

Healthy Halloween treat ideas, ORANGE MUMMIES, #Mummy, #Fruit, #Halloween, #Healthy

Healthy Halloween treat ideas, ORANGE MUMMIES, #Mummy, #Fruit, #Halloween, #Healthy

Healthy Halloween treat ideas, ORANGE MUMMIES, #Mummy, #Fruit, #Halloween, #Healthy

Materials:

  • Any fresh fruit such as apples, clementines, grapefruits, oranges, pears, pineapple, pomegranate, etc.
  • White Crepe paper
  • Scotch tape or masking tape
  • Candy eyes (or stick-on wiggly eyes)
  • Black gel frosting

Directions:

  1. Tape one end of crepe paper to fruit.
  2. Start wrapping it around the fruit to make it look like a mummy. Leave part of the fruit uncovered, so you can glue on the eyes.
  3. Use black gel frosting to glue on the candy eyes.
  4. Keep fruit refrigerated until ready to serve.
Witch Hat Cookies:

Witch hat cookies, #Halloween, #cookies, #kisses, #easy

Ingredients:

  • Fudge shortbread cookies
  • Hershey kisses
  • Orange icing or almond butter or peanut butter

Directions:

  1. Unwrap Hershey kisses and set aside.
  2. Apply a small dot of orange frosting, almond butter, or peanut butter in the middle of the fudge side of a cookie.
  3. Gently press a Hershey kiss onto the icing or butter with just enough pressure to cause icing or butter to ooze out a bit.
  4. If almond or peanut butter is used, store witch hat cookies in refrigerator until ready to serve.
Witch hat cookies, #halloween, #witchhat, #cookies, #easy, #Halloweenfood, #hat, #witch

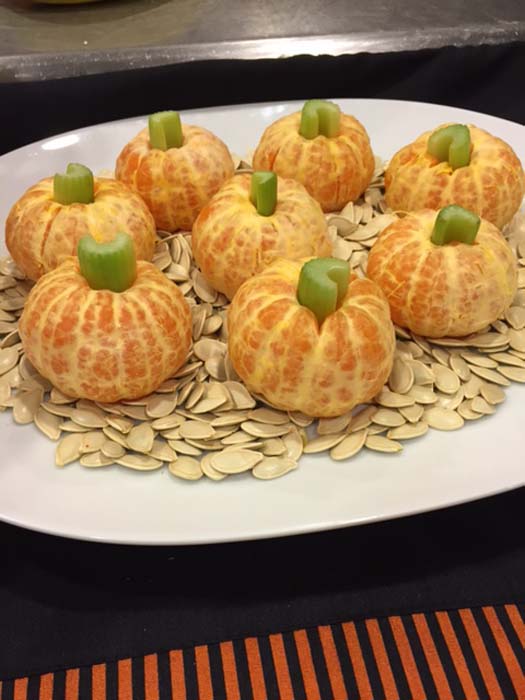
Clementines with celery stalks in a pumpkin seed patch

HAVE A HAPPY AND SAFE HALLOWEEN!!!


{ Comments on this entry are closed }

Tangerine Pumpkins and Banana Ghosts from Weelicious

Banana Ghosts and Clementine Pumpkins

Picky little eaters love fun food like this. It’s also a great way to get them to eat some extra fruit.

A healthy Halloween snack is a refreshing change from the usual artificially-colored, artificially-flavored, sugary treats associated with the holiday. The following easy-to-make treats are adorable, nutritious, and prepared in no time. This is definitely a time for your children to pitch in. They’ll have fun putting together the delightful pumpkins, ghosts, spiders, and other creations. If your children are allowed to bring snacks to school or daycare for Halloween, these healthier options will be welcomed by teachers and parents alike. The recipes below are a great alternative to all the candy the children will get when trick or treating. 

Banana Ghosts:
Servings: 8
Preparation: 5
Ingredients:
  • 4 bananas
  • 24 raisins, currants, or chocolate chips (mini chips for eyes, 1 regular chocolate chip or raisin for mouth)
Directions:
  1. Peel the bananas and cut them in half. Place them cut side down, so the banana halves stand up.
  2. Using a toothpick in a circular motion, make a small hole for each eye and the mouth (This step is helpful, especially when using raisins or currants, instead of chocolate chips).
  3. Poke the pointed end of two mini chocolate chips in each banana half for the ghost’s eyes and one regular size chocolate chip, point facing in, for the ghostly mouth.

Clementine Pumpkins:

Servings: 12

Preparation: 5

Ingredients:

  • 1 bag or box clementines (Naval oranges or tangerines may be substituted)
  • 2-3 stalks of celery, cut crosswise into 3 or 4 segments, each about 1-2 inches long, and then sliced in lengthwise in half

Directions:

  1. Peel each clementine by hand carefully, so it does not come apart. Remove the middle pith, if possible.
  2. Cut each celery stalk into pieces 1-inch or longer, to make pumpkin stems and insert it into the top of the fruit, so that it resembles a pumpkin stalk.
  3. Adjust the width and length of the celery stems according to the size of your “pumpkins.”

Mini Mummy Pizzas: These English muffin pizzas, topped with greens, sweet peppers, string cheese, and olives can be served for breakfast, lunch, dinner, or as a snack after a night of trick-or-treating. 

Add a Photo | View All Photos

Servings: 4

Ingredients:

  • 4 whole wheat English muffins or whole grain bagels, split and lightly toasted
  • 2/3 cup pasta sauce or red pepper marinara sauce
  • 1 cup finely chopped kale, chard, or spinach.
  • 1 yellow or green bell pepper, cored, and finely chopped
  • 1 (6-ounce) package light string cheese
  • 16 slices of black olives for eyes
Directions:
  1. Preheat the oven to 400°F.
  2. Arrange muffins on a parchment paper-lined baking sheet and spoon sauce onto each half.
  3. Top with kale and peppers, and then shred cheese into strings, arranging it over muffins, like mummy bandages.
  4. Arrange 2 olive slices on each muffin half for eyes, and bake until cheese is melted, about 15 minutes.
Nutrition Per Serving (1 whole muffin): 260 calories (60 from fat), 6 g total fat, 3.5 g saturated fat,
 15 mg cholesterol, 610 mg sodium, 33 g carbohydrate (6 g dietary fiber, 8 g sugar),18 g protein.
Spooky Spider Eggs:
Servings: 8
Ingredients:
  • 4 boiled eggs, each sliced lengthwise in half
  • 12 pitted black olives (4 for the 8 spider bodies plus 8 for their legs)
Directions:
  1. Cut each olive in half lengthwise.
  2. Nestle one half on top of an egg (either deviled or just sliced in half) for each spider body.
  3. Cut remaining olive halves crosswise into thin slices to form creepy legs. The equivalent of a whole olive is needed to provide all 8 legs for 1 spider.
  4. Arrange spider legs as shown above.

IMG_0458

Apple Almond Teeth:
Halloween Fruit Apple Teeth Treats Recipe
Preparation time: 15 minutes
Servings: 16
Ingredients:
  • 4 fresh apples (any variety in season), cored, and quartered
  • 2 teaspoons lemon juice (optional)
  • 1 (2.25 ounce) package blanched slivered almonds

Directions:

  1. With a small, sharp paring knife, cut a lengthwise wedge from the skin side of each apple quarter, leaving the peel around the wedge for lips.
  2. If desired, rub cut portions of apple quarters with lemon juice to prevent browning.
  3. Poke 6 slivered almonds into the top and 6 into the bottom of the cut-out area of the apple to make crooked teeth.

Apple Marshmallow Smiles:

Ingredients:

  • Smooth peanut butter (for gums)
  • 1 apple, cored, and sliced into eighths (for lips)
  • Miniature marshmallows (for teeth)

Directions:

  1. Spread peanut butter on one side of each apple slice.
  2. Place 4-5 miniature marshmallows on one apple slice and then lay another apple slice, peanut butter side down, on top.

Ghastly Goblin Grins:  

Preparation: 20 min
Servings: 8
Ingredients:
  • 1 pkg. (8 oz.) Neufchatel or regular cream cheese, softened
  • 1/2 cup packed brown sugar
  • 1/2 tsp. vanilla
  • 2 large apples, cut into quarters
  • 1/4 cup slivered almonds
Directions:
  1. Beat cream cheese with mixer until creamy. Add sugar and vanilla and mix well.
  2. Cut thin wedge in peel side of each apple piece. Fill wedge with 1 teaspoon cream cheese mixture.
  3. Press 6 nut slivers into cream cheese mixture in each apple to resemble teeth.
  4. Spoon remaining cream cheese mixture into serving bowl. Serve with apples, carrots, celery, or pretzels for dipping.
  5. Store leftovers in covered container in refrigerator.
Mummy Toast:
Mummy Toast.
Mummy Toast (#1):
Servings: 8 pizzas
Ingredients:
  • 3/4  pound thinly sliced mozzarella cheese
  • 1 loaf whole grain or Italian bread
  • 1 cup pasta, pizza, or marinara sauce
  • 1/4 cup sliced black olives
Directions:
  1. Preheat broiler. Line 2 cookie sheets with aluminum foil and set aside.
  2. Cut the sliced cheese into 3/4-inch tapered strips to create bandages.
  3. Slice off the rounded ends of the loaf. Cut the bread in half lengthwise. Cut each half crosswise into 4 pieces. Place the bread, cut side up, on prepared cookie sheets. Toast bread slices slightly, 1 to 2 minutes.
  4. Spread some sauce to cover the top of each toasted bread slice. Arrange the cheese strips, overlapping them slightly, on top of the sauce, to resemble bandages.
  5. Add 2 olive slices to each toast for the eyes. Place another slice of cheese over the olives to cover slightly.
  6. Working with one pan at a time, broil the pizzas until the cheese is slightly melted, about 1 to 2 minutes.
Servings: 4 lunch servings or 8 snack servings
Ingredients:
  • 8 slices whole-grain bread
  • 1 cup pasta, pizza, or marinara sauce
  • 6-8 slices part-skim mozzarella cheese, sliced into strips 
  • 8 black or green olives, sliced in half

Directions for untoasted treat:

  1. Top each slice of untoasted bread with two tablespoons of sauce.
  2. Arrange strips of cheese to look like bandages, leaving space between each one and alternating the direction.
  3. Place olive slices on each slice for “eyes.”

Directions for broiler-toasted treat:

  1. Preheat broiler.
  2. Place the bread slices on a baking sheet and top each slice with two tablespoons of sauce.
  3. Arrange strips of cheese to look like bandages, leaving space between each one and alternating the direction.
  4. Place olive slices on each slice for “eyes.”
  5. Broil pizza toast until the cheese has melted.

Directions for quick-toasted treat:

  1. Toast bread slices in toaster until medium-brown.
  2. Spread with hot, cooked marinara sauce.
  3. Cut thin strips of American, Cheddar, Mozzarella or Provolone cheese and arrange on each toast like bandages.
  4. Use olive slices for eyes.
Mummy-Face Pizzas:

Ingredients:

  • 1 Plain bagel (3-1/2 inch), cut horizontally in half or split English muffin
  • 2 tablespoons pizza sauce
  • 2 sticks Kraft or Polly-O Mozzarella String Cheese
  • 4 black or stuffed green olives slices

Directions:

  1. Heat oven to 400ºF.
  2. Spread bagel halves with sauce. Pull cheese into thin strips; place in random criss-cross fashion on tops of bagels to resemble mummy bandages. Trim ends with kitchen shears or sharp knife. Add olives for the eyes.
  3. Place on baking sheet.
  4. Bake 10 minutes or until bagels are crisp and cheese is melted.

Cracker or Pita Face:

Ingredients:
  • Small pitas, whole grain crackers, or mini bagels
  • Yogurt, cottage cheese, or cream cheese slathered on top of cracker for face (optional)
  • Cheese (American, cheddar, string, etc.) or turkey, cut in strips for hair
  • Ham, black or green olive, or seitan slices for eyes
  • Baby carrots or large carrots cut into small pieces for nose
  • Sliced tomato wedges for mouth
Servings: 6-8

Ingredients:

  • 1 (8-ounce) package cream cheese, softened (Plain Greek yogurt or cottage cheese can be substituted for cream cheese)
  • 3 tablespoons honey
  • 1/4 cup pumpkin purée
  • 1 (11.25-ounce) package Whole Foods Market® Two-Bite® Belgian Chocolate Brownies
  • 1 tablespoon mini chocolate chips
  • 6 dried apricots, thinly sliced
Directions:
  1. In a large bowl, beat cream cheese and honey with electric mixer on medium speed for 30 seconds.
  2. Transfer about 2 tablespoons of this mixture to a small, resealable plastic bag and set aside.
  3. Add pumpkin to remaining cream cheese mixture and beat again for 30 seconds.
  4. Transfer orange frosting to a second resealable plastic bag.
  5. Snip off one corner from each bag of frosting (very small for white frosting).
  6. Pipe a generous layer of orange frosting over the top of each brownie.
  7. Pipe 2 small dots with white frosting to form eyes. Arrange a chocolate chip in the middle of each eye.
  8. For spiders, arrange dried apricot slices as legs, sticking them into the frosting on either side.
Nutrition per serving (2 brownies):
290 calories (150 from fat), 17g total fat, 9g saturated fat, 45mg cholesterol, 160mg sodium,
 35g carbohydrate (2g dietary fiber, 21g sugar), 4g protein.

HAVE A HAPPY AND SAFE HALLOWEEN!!!

{ Comments on this entry are closed }

Moroccan Eggs I 24 Carrot Life

This meal is quick and easy to prepare, delicious, nutritious, and perfect for a heart-healthy, high protein breakfast, brunch, lunch, or dinner. Leftovers are yummy, whether eaten cold or reheated in the microwave.

Servings: 2-4

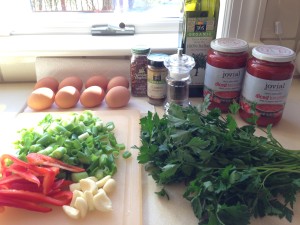
Ingredients:

  • 2-4 pieces flatbread, pita, naan, lavash, or other crusty bread
  • 2 tablespoons extra virgin olive oil
  • 6 scallions, trimmed and roughly chopped (or 1 chopped red or yellow onion)
  • 4 large peeled garlic cloves, sliced or minced
  • 1 14- or 28-oz. can of diced or crushed tomatoes, or 4 cups chopped fresh tomatoes
  • 1 1/2 teaspoons ground cumin
  • 1-2 pinches or 1/4 teaspoon of cayenne pepper or red chili flakes
  • 1 tablespoon honey (optional)
  • 4 organic eggs
  • 3 tablespoons fresh cilantro or Italian flat-leaf parlsey, roughly chopped
  • Black pepper to taste

Directions:

  1. Preheat oven to 250 degrees F. Wrap bread in aluminum foil and place in oven to warm, while you’re preparing the eggs.
  2. Heat olive oil over medium high heat in an 8-inch or medium frying pan large enough for cooking all remaining ingredients.* Once hot, add chopped scallions, or onion, and garlic and cook for about 3-4 minutes, or until translucent.
  3. Stir in tomatoes, cumin, and cayenne pepper or red chili flakes.** Raise heat and cook until ingredients bubble.
  4. Using the back of a large cooking spoon, make a depression in the stew for each egg. Crack eggs one by one into a separate bowl to ensure there are no shell pieces. Slowly add one egg into each depression, repeating separately with each egg.
  5. Gently stir egg whites all around. Cover the skillet and allow eggs to poach on medium-low heat, until the whites and yolks have set, about 5 minutes or more for soft yolks or up to 10 minutes for firm yolks.
  6. Sprinkle black pepper and fresh chopped cilantro or parsley on top.
  7. Divide the eggs and stewed vegetables among four warm bowls using a large spoon.
  8. Serve immediately with warm crusty bread.

*  A 10- or 12-inch frying pan should work if doubling the recipe.

**Chopped kale, parsley, bell peppers, spinach, Swiss chard, etc., may be stirred into ragout at this point, if you wish.

IMG_0485IMG_0487
IMG_0488

{ Comments on this entry are closed }

“Use it up, wear it out, make it do, or do without”

(New England proverb originally used in 1930′s)

Reduce: The best way to manage waste is to not produce it! 

  • Plan a shopping list to prevent purchasing on impulse.
  • Purchase products that will not go out of fashion quickly.
  • Buy products in bulk: Larger, economy-size products or ones in concentrated form use less packaging and usually cost less per ounce.
  • Look for items that use little or no packaging.
  • Avoid overly-packaged goods. The packaging is a total throw-away, difficult to recycle, and often increases your cost.
  • Avoid disposable goods, such as paper plates, cups, napkins, razors, and lighters. Throwaways contribute to the waste problem and cost more, because they must be replaced again and again.
  • Buy durable items that are well-built, last a long time, or carry good warranties. They will save you money and landfill space.
  • Avoid things made with toxic materials, such as most household cleansers.
  • Reduce water use at home.
  • Waste less energy on lights and equipment.
  • Make two-sided copies whenever possible.
  • Maintain central files rather than using several files for individuals.
  • Use electronic mail or a main bulletin board.
  • Remove your name from mailing lists of materials you no longer want to receive: write to Mail Preference Service, c/o Direct Marketing Assoc., P.O. Box 90008, Farmingdale, NY 11735.
  • Use cloth napkins instead of paper napkins.
  • Use a sponge, dish cloth, or clean rags, instead of paper towels for cleaning.
  • Eat less meat and more plant foods.
  • Use a reusable lunch bag or box, instead of throwing away a paper bag each day!
  • When you make a purchase, don’t take a bag unless you absolutely need one.
  • Rent things you use infrequently instead of purchasing them.
  • Use reusable plastic containers for food instead of plastic bags.
  • Use rechargeable batteries instead of disposable ones.
  • Read books, magazines, and newspapers at the library instead of purchasing them.
  • Use plates, cups, and utensils that can be washed instead of ones you throw away.
  • Purchase items like juice and detergent in concentrate when possible.
  • Avoid buying foods in single serving packages.
 Reuse: Be creative and ‘wear it out’!
  • Bring a grocery or shopping bag from home when shopping, instead of requesting plastic or paper bags.
  • Reuse products for the same purpose: Save paper and plastic bags, use rechargeable batteries, repair broken appliances, furniture, and toys.
  • Use unwanted plastic bags to collect garbage.
  • Convert scrap paper into memo pads.
  • Use your own eating utensils & ceramic mug, instead of disposable ones & paper cups.
  • Reuse used glass, metal, and plastic containers as receptacles.
  • Clean and reuse ornaments and washable eating utensils for your next festive celebration.
  • Use refillable items, e.g., dish-washing liquid, shampoo, stainless steel beverage containers to store water for washing hands when away from home, watering plants, drinking water, etc.
  • Use old clothing as rags for cleaning, instead of paper towels.
  • Use washable, resealable containers rather than plastic wrap or a one-time container for packing food.
  • Store perishable foods (bread, fruits) in the refrigerator, so they last longer.
  • Pass old textbooks, story books, childrens’ clothing, and toys to others who can use them.
  • Donate good quality but unwanted clothing, blankets, towels, appliances, furniture, toys, and other items to those in need, Goodwill, Salvation Army, or other charitable organizations, or sell them in garage sales or ads.
 Recycle: Take used material and process, remanufacture, and sell it as a new product! 
  • Purchase and use products made from recycled material. Look for the recycling symbol or ask a store representative. The recycling symbol means the product is either made of recycled material or can be recycled. (Many plastic containers have a recycling symbol with a numbered code that identifies what type of plastic resin it is made from. However, just because the container has this code does not mean it can be easily recycled locally.)
  • Participate in your community, school, home-goods store, and hazardous waste recycling program. Check to see what they accept, and begin collecting those materials (metal cans, newspapers, paper products, glass, plastics, oil).
  • Purchase recycled materials at work for office supply, office equipment, or manufacturing.
  • Speak to store managers and ask for products and packaging that help reduce waste, such as recycled products and products that are not over-packaged.
  • Use recycled paper for letterhead, copier paper, and newsletters.
  • Use both sides of paper for writing, memos, calculations, problem solving.
  • Recycle used envelopes, boxes, gift bags, wrapping paper, and packaging.
  • Deposit recyclable items into designated recycling bins.
  • Hazardous waste recycling is necessary for batteries which often contain heavy metals like mercury, lead, cadmium, and nickel, many cleaning products, oils, paints, pesticides, and tires.
  • Return lead-acid car batteries and used motor oil to almost any garage or auto-supply store that sells them or a community-collection event.

Reduce Reuse Recycle Sign


{ Comments on this entry are closed }

Fresh water is the lifeblood of our planet. No one can survive without it.

Water is an important source of food, health, energy, and transportation and supports a huge diversity of life on earth. Civilizations could not have existed without access to fresh water. However, fresh water is not possible without a healthy planet, and today human actions are putting our planet at risk.

Water conservation must become a higher priority for Americans who use more water per person than citizens of any other country. According to the Environmental Protection Agency, an American family of four uses water at a rate of 400 gallons per day at home alone.

In 2008, at least 36 states expected to have a water shortage by 2013, according to U.S. government estimates. Why? Increasing population growth and sprawl, rising temperatures, droughts, and inefficient water use. The National Oceanic and Atmospheric Administration (NOAA) reported in December 2013 that 11 major US cities could expect to experience severe water shortages in the near future.

Of the world’s total water supply, 97.5 % is salt water, and less than 0.5 % is usable, unpolluted clean water. Many major rivers around the world, including the Colorado, Ganges, Rio Grande, and Yellow, are running dry part of the year.

Carefully conserving water lessens the damaging effects of droughts. Droughts decrease food production, raise food prices, increase fire hazards, as well as worsen soil erosion and insect infestation. They are a normal part of climate cycles, so they can be somewhat anticipated and planned for. Therefore it is possible and crucial to conserve water now to minimize the effects of drought later.

Perovskia atriplicifolia 'Superba' (Russian sage)

Russian sage (Perovskia atriplicifolia), a drought-tolerant perennial and member of the mint family, adds beautiful color to a desert landscape. 

How much water do we generally use each day?

A family of four in the United States uses 400 gallons of water every day, enough to take 10 baths! By being smarter about water use, we can save water, energy, money, and help our environment, too. When we use water more efficiently, we leave more water in rivers and streams to support fish, wildlife, and recreation.

Highest volume water use inside the home:

  • Toilet: 20-26% (although water-saving toilets can reduce this amount)
  • Clothes Washer: 19-22%
  • Shower: 19% (water-saving faucets can cut this figure down)
  • Faucets: 19%
  • Leaks: 14%

Start conserving water today. Small adjustments can make a big impact. Here are some tips to save water and protect rivers, wildlife, and our future:

Wash laundry and dishes only when there is a full load.

Always turn off running water.

Take shorter showers.

Eliminate any and all leaks.

Reduce the flow of toilets and showerheads.

  • Consider purchasing a low-volume toilet that uses less than half the water of older models. Note: In many areas, low-volume units are required by law.
  • Install a toilet displacement device to cut down on the amount of water needed to flush. Place a one-gallon plastic jug of water into the tank to displace toilet flow (do not use a brick, it may dissolve and loose pieces may cause damage to the internal parts). Be sure installation does not interfere with the operating parts.
  • Replace your shower head with an ultra-low-flow version.
  • Place a bucket in the shower to catch excess water for watering plants.
  • Avoid flushing the toilet unnecessarily. Dispose of tissues, insects, and other similar waste in the trash rather than the toilet.
  • Avoid taking baths – take short showers – turn on water only to get wet and lather and then again to rinse off.
  • Avoid letting the water run while brushing your teeth, washing your face, or shaving.

Kitchen tips:

  • Dishwashers typically use less water than washing dishes by hand. Energy Star dishwashers save even more water and energy.
  • Try to run the dishwasher or washing machine only when completely full.
  • If you live in an older home, consider replacing your plumbing with low-flow fixtures and low-flush toilets.
  • If your dishwasher is new, cut back on rinsing. Newer models clean more thoroughly than older ones.
  • Designate one glass for your drinking water each day, or refill a water bottle. This will reduce the number of glasses to wash.
  • Soak pots and pans instead of letting the water run while you scrape them clean. Don’t let water run needlessly when washing dishes, shaving, or brushing your teeth When washing dishes by hand, fill one basin with wash water and the other with rinse water.
  • Use the garbage disposal minimally. Instead, compost vegetable food waste and save gallons every time.
  • Wash fruits and vegetables in a pan of water instead of running water from the tap.
  • Don’t use running water to thaw food. For water efficiency and food safety, defrost food in the refrigerator.
  • Install an instant water heater near your kitchen sink, so you don’t have to run the water while it heats up. This also reduces energy costs.
  • Keep a pitcher of drinking water in the refrigerator instead of running the tap. This way, every drop goes down you and not the drain.
  • Reuse leftover water from cooked or steamed foods to start a nutritious soup. It’s one more way to get eight glasses of water a day.
  • Cook food in as little water as possible. This also helps it retain more nutrients.
  • Select the proper pan size for cooking. Large pans may require more cooking water than necessary.
  • If you accidentally drop ice cubes, don’t throw them in the sink. Drop them in a house plant instead.
  • When shopping for a new dishwasher, washing machine, showerhead, or other appliance, use Consumer Reports and other reviews to compare resource savings among Energy Star models and choose efficient. Some dishwashers can save up to 20 gallons of water per load!
  • Dispose of chemicals properly at a hazardous waste drop-off center. Never pour them on the ground, into the sewer, or down the drain.

Laundry tips:

  • Only run your washing machine and dishwasher when they are full.
  • When doing laundry, match the water level to the size of the load.
  • Washing dark clothes in cold water saves water and energy, and helps your clothes retain their color.

Bathroom tips:

  • Shorten your shower by a minute or two. You’ll save up to 150 gallons per month.
  • Keep your shower under 5 minutes. You’ll save up to 1,000 gallons per month.
  • Toilet leaks can be silent! Test your toilet for leaks at least once a year.
  • Put food coloring in your toilet tank. If it seeps into the bowl without flushing, there’s a leak. Fix it to save gallons.
  • When running a bath, plug the bathtub before turning on the water. Adjust the temperature as the tub fills.
  • Upgrade old toilets with water-saving models.
  • Use a water-conserving showerhead. It is inexpensive, easy to install, and can save up to 750 gallons a month.
  • Turn off the water when brushing your teeth to save up to 4 gallons a minute. That’s up to 200 gallons a week for a family of four.
  • Plug the bathtub before turning the water on, and then adjust the temperature as the tub fills up.
  • Fix dripping faucets and running toilets. Just one drip a second can waste 2,000 gallons of water per year.
  • Plug the sink instead of running the water to rinse your razor, and save up to 300 gallons a month.
  • Turn off the water while washing your hair, and save up to 150 gallons a month.
  • When washing your hands, turn the water off while you lather.
  • Place a bucket in the shower to catch excess water to use to water plants later. This also works when washing dishes or vegetables in the sink.
  • Take 5-minute showers instead of baths. A full bathtub requires up to 70 gallons of water.
  • Install water-saving aerators on all of your faucets.
  • Drop tissues in the trash instead of flushing them and save water every time.
  • Look for water-conserving toilets, sink faucets, urinals, and showerheads.
  • One drip every second adds up to five gallons per day! Check your faucets and showerheads for leaks.
  • While you wait for hot water, collect the running water and use it to water plants.

General indoor tips:

  • Teach children to turn off faucets tightly after each use.
  • When the kids want to cool off, use the sprinkler in an area where your lawn needs it most.
  • Encourage your school system and local government to develop and promote water conservation among children and adults.
  • Monitor your water bill for unusually high use. Your bill and water meter can help you discover leaks.
  • Learn how to use your water meter to check for leaks.
  • Reward kids for water-saving tips they follow.
  • Avoid recreational water toys that require a constant flow of water.
  • Fix leaky faucets with a wrench. It’s simple, inexpensive, and can save 140 gallons a week.
  • Watch for leaks. Check all hoses, connectors, and faucets regularly for leaks.
  • We’re more likely to notice leaky faucets indoors, but don’t forget to check outdoor faucets, pipes, and hoses.
  • See a leak you can’t fix? Tell a parent, teacher, employer, or property manager, or call a handyman.
  • At home or while staying in a hotel, reuse your towels.
  • Run your washer and dishwasher only when they are full to save up to 1,000 gallons a month.

Xeriscape landscaping (Lawn and plant care with water conservation in mind):

  • Use porous material for walkways and patios to prevent wasteful runoff and keep water in your yard.
  • Group plants with the same watering needs together to avoid overwatering some while underwatering others.
  • Plant species native to your region.
  • Water your lawn only when necessary and consider landscaping with native plants adaptable to your climate’s conditions.
  • Plant in the spring and fall, when watering requirements are lower.
  • When sprucing up your front or backyard, consider xeriscaping. This landscape method uses low-water-use plants to limit your water use.
  • Avoid planting grass in areas that are hard to water, such as steep inclines and isolated strips along sidewalks and driveways.
  • Leave lower branches on trees and shrubs and allow leaf litter to accumulate on the soil. This keeps the soil cooler and reduces evaporation.
  • Start a compost pile. Using compost in your garden or flower beds adds water-holding organic matter to the soil.
  • Use a layer of organic mulch on the surface of your planting beds and around plants to retain moisture, save water, time weeding and watering, and minimize weed growth that competes for water. Two to four inches of organic mulch around plants will reduce evaporation and save hundreds of gallons of water a year.
  • Next time you add or replace a flower or shrub, choose a low-water-use plant and save up to 550 gallons each year.
  • Collect water from your roof by installing gutters and downspouts. Direct the runoff to plants and trees.
  • Direct water from rain gutters and HVAC systems to water-loving plants in your landscape.
  • Adjust your lawn mower to the height of 1.5 to 2 inches. Taller grass shades roots and holds soil moisture better than short grass.
  • Leave lawn clippings on your grass, this cools the ground and holds in moisture.
  • Aerate your lawn periodically. Holes every six inches will allow water to reach the roots, rather than run off the surface.
  • If walking across the lawn leaves footprints (blades don’t spring back up), then it is time to water.
  • Let your lawn go dormant (brown) during the fall and winter. Dormant grass only needs to be watered every 3-4 weeks, less if it rains.
  • Weed your lawn and garden regularly. Weeds compete with other plants for nutrients, light, and water.
  • Fertilizers promote plant growth and also increase water consumption. Apply the minimum amount of fertilizer needed.
  • Use a trowel, shovel, or soil probe to examine soil moisture depth. If the top two to three inches of soil are dry, it’s time to water.
  • Set a kitchen timer when using the hose as a reminder to turn it off. A running hose can discharge up to 10 gallons per minute.
  • Check your sprinkler system frequently and adjust sprinklers, so only your lawn is watered and not the house, sidewalk or street.
  • Minimize evaporation by watering during early morning hours when temperatures are cooler and winds are lighter.
  • Learn how to shut off your automatic watering system in case of malfunctions or rain.
  • Apply water only as fast as the soil can absorb it.
  • If water runs off your lawn easily, split your watering time into shorter periods to allow for better absorption.
  • Water only when necessary. More plants die from over-watering than from under-watering.
  • Prevent overwatering: Leaves turn lighter shades of green or yellow, young shoots wilt, and sometimes algae or fungi grow.
  • Adjust your watering schedule each month to match seasonal weather conditions and landscape requirements.
  • Install a rain sensor on your irrigation controller, so your system won’t run when it’s raining.
  • Don’t water your lawn on windy days, when most of the water blows away or evaporates.
  • Use drip irrigation for shrubs and trees to apply water directly to the roots, where it’s needed.
  • Water plants deeply, but less often, to encourage deep root growth and drought tolerance.
  • Use sprinklers that deliver big drops of water close to the ground. Smaller drops and mist often evaporate before hitting the ground.
  • Forty % of the average homeowner’s water use is outdoors. Use a rain barrel or large buckets to collect rainwater from downspouts and gutters for watering gardens and landscapes. Use this to water your plants.
  • For hanging baskets, planters, and pots, put ice cubes on top of the soil to give your plants a cool drink of water without overflow.
  • Periodically check sprinkler system valves for leaks, and to keep sprinkler heads in good shape.
  • Spring is a great time to give your irrigation system a checkup to ensure it’s working efficiently.
  • Prune properly to help plants use water more efficiently.
  • Plant a rain garden to add beauty to your yard, while absorbing and filtering runoff. Water absorbed in a rain garden will filter pollution otherwise headed for streams.
  • Avoid using pesticides or herbicides on your yard and garden. The chemicals can contaminate groundwater and streams, and can also hurt kids and pets.
  • In the yard, use mulch to keep moisture from leaving the soil and minimize the need to water.
  • If you must water the lawn, water in the early morning or evening, and try to avoid watering on windy days. This will limit the amount of water that is wasted. Rain barrels reduce stress on municipal water systems during dry, summer months.

“Only when the last tree has died and the last river been poisoned and the last fish been caught will we realize we cannot eat money.” 

Cree Indian Proverb

References:

  1. Source: http://www.americanrivers.org/take-action/other-ways/conserve/?gclid=CKHS3cG8wsACFSgV7AodOBIAxQ#sthash.EdfqNHvz.dpuf
  2. Preserving Our Water-conservation.org.
  3. Adwww.conservation.org/freshwater.‎
  4. Conserving water: Green Homes. U.S. Environmental Protection Agency (EPA). (Source: www.epa.gov/greenhomes/conservewater.htm).
  5. 100+ Ways to Conserve Water-Use It Wisely. (Source: American Rivers.org. wateruseitwisely.com/100-ways-to-conserve/‎).
  6. 100 Ways to Save Water-Loudoun Water. (Source: www.loudounwater.org/Residential…/100-Ways-to-Save-Water/‎).
 

{ Comments on this entry are closed }

 Even if you drink less than a pint of beer or two small glasses of wine a day, this still poses a risk to your health.
Remember, filling a wine glass to the brim is not considered a glass of wine!


Reducing the amount of alcohol consumed, even for light-to-moderate drinkers, may improve cardiovascular health, reduce coronary heart disease, and lower body mass index (BMI) as well as blood pressure, according to a new multi-center study co-led by the Perelman School of Medicine at the University of Pennsylvania. The findings, which were published in the British Medical Journal on July 10, 2014, contradict previous studies which suggested that consuming light-to-moderate amounts of alcohol (0.6-0.8 fluid ounces/day) may have a protective effect on cardiovascular health.

The new research reviewed evidence from more than 50 studies that linked drinking habits and cardiovascular health for over 260,000 people. Researchers found that individuals who carry a specific gene which typically leads to lower alcohol consumption over time have, on average, superior cardiovascular health records. Specifically, the results show that individuals who consume 17% less alcohol per week have on average a 10% reduced risk of coronary heart disease, lower blood pressure, and a lower BMI.

“These new results are critically important to our understanding of how alcohol affects heart disease. Contrary to what earlier reports have shown, it now appears that any exposure to alcohol has a negative impact upon heart health,” says co-lead author Michael Holmes, MD, PhD, research assistant professor in the department of Transplant Surgery at the Perelman School of Medicine at the University of Pennsylvania. “For some time, observational studies have suggested that only heavy drinking was detrimental to cardiovascular health, and that light consumption may actually be beneficial. This has led some people to drink moderately, based on the belief that it would lower their risk of heart disease. However, what we’re seeing with this new study, which uses an investigative approach similar to a randomized clinical trial, is that reduced consumption of alcohol, even for light-to-moderate drinkers, may lead to improved cardiovascular health.”

In the new study, researchers examined the cardiovascular health of individuals who carry a genetic variant of the ‘alcohol dehydrogenase 1B’ gene, which is known to metabolize (break down) alcohol more quickly. This rapid breakdown causes unpleasant symptoms including nausea and facial flushing, and has been found to lead to lower levels of alcohol consumption over time. By using this genetic marker as an indicator of lower alcohol consumption, the research team was able to identify links between these individuals and improved cardiovascular health.

The study was funded by the British Heart Foundation and the Medical Research Council, and was an international collaboration that included 155 investigators from the United Kingdom, continental Europe, North America, and Australia.

Take good care of your heart. It’s the only one you’ve got! 

References

  1. M. V. Holmes, C. E. Dale, L. Zuccolo, R. J. Silverwood, Y. Guo, Z. Ye, D. Prieto-Merino, A. Dehghan, S. Trompet, A. Wong, A. Cavadino, D. Drogan, S. Padmanabhan, S. Li, A. Yesupriya, M. Leusink, J. Sundstrom, J. A. Hubacek, H. Pikhart, D. I. Swerdlow, A. G. Panayiotou, S. A. Borinskaya, C. Finan, S. Shah, K. B. Kuchenbaecker, T. Shah, J. Engmann, L. Folkersen, P. Eriksson, F. Ricceri, O. Melander, C. Sacerdote, D. M. Gamble, S. Rayaprolu, O. A. Ross, S. McLachlan, O. Vikhireva, I. Sluijs, R. A. Scott, V. Adamkova, L. Flicker, F. M. v. Bockxmeer, C. Power, P. Marques-Vidal, T. Meade, M. G. Marmot, J. M. Ferro, S. Paulos-Pinheiro, S. E. Humphries, P. J. Talmud, I. M. Leach, N. Verweij, A. Linneberg, T. Skaaby, P. A. Doevendans, M. J. Cramer, P. v. d. Harst, O. H. Klungel, N. F. Dowling, A. F. Dominiczak, M. Kumari, A. N. Nicolaides, C. Weikert, H. Boeing, S. Ebrahim, T. R. Gaunt, J. F. Price, L. Lannfelt, A. Peasey, R. Kubinova, A. Pajak, S. Malyutina, M. I. Voevoda, A. Tamosiunas, A. H. Maitland-van der Zee, P. E. Norman, G. J. Hankey, M. M. Bergmann, A. Hofman, O. H. Franco, J. Cooper, J. Palmen, W. Spiering, P. A. d. Jong, D. Kuh, R. Hardy, A. G. Uitterlinden, M. A. Ikram, I. Ford, E. Hypponen, O. P. Almeida, N. J. Wareham, K.-T. Khaw, A. Hamsten, L. L. N. Husemoen, A. Tjonneland, J. S. Tolstrup, E. Rimm, J. W. J. Beulens, W. M. M. Verschuren, N. C. Onland-Moret, M. H. Hofker, S. G. Wannamethee, P. H. Whincup, R. Morris, A. M. Vicente, H. Watkins, M. Farrall, J. W. Jukema, J. Meschia, L. A. Cupples, S. J. Sharp, M. Fornage, C. Kooperberg, A. Z. LaCroix, J. Y. Dai, M. B. Lanktree, D. S. Siscovick, E. Jorgenson, B. Spring, J. Coresh, Y. R. Li, S. G. Buxbaum, P. J. Schreiner, R. C. Ellison, M. Y. Tsai, S. R. Patel, S. Redline, A. D. Johnson, R. C. Hoogeveen, H. Hakonarson, J. I. Rotter, E. Boerwinkle, P. I. W. d. Bakker, M. Kivimaki, F. W. Asselbergs, N. Sattar, D. A. Lawlor, J. Whittaker, G. Davey Smith, K. Mukamal, B. M. Psaty, J. G. Wilson, L. A. Lange, A. Hamidovic, A. D. Hingorani, B. G. Nordestgaard, M. Bobak, D. A. Leon, C. Langenberg, T. M. Palmer, A. P. Reiner, B. J. Keating, F. Dudbridge, J. P. Casas. “Association between alcohol and cardiovascular disease: Mendelian randomisation analysis based on individual participant data.” British Medical Journal. 07/10/14. 349 (6): g4164 DOI: 10.1136/bmj.g4164.
  2. “Drinking alcohol provides no heart health benefit, new study shows.” University of Pennsylvania School of Medicine. ScienceDaily. 07/10/14. <www.sciencedaily.com/releases/2014/07/140710151947.htm>.
  3. “To Your Health–Why Men and Women Should Limit Alcohol Use (It’s not what you think!).” www.dianesays.com. 04/26/11.


{ Comments on this entry are closed }

Home Remedy Reverses Chronic Constipation - The People's Pharmacy® Here is a recipe:   1 cup prune juice   1 cup bran cereal   1 cup applesauce  Blend all ingredients, cover, and refrigerate up to one week. Take two tablespoons daily..or google "Power Pudding."

Constipation is defined as the inability to have three or more bowel movements in a week. When constipated, you have difficulty having a bowel movement or pass stools that are excessively hard. Straining for more than 10 minutes and being unable to have a bowel movement is also a sign you’re constipated.

Several factors can lead to constipation: inadequate dietary fiber, inadequate physical activity, dehydration, and medical conditions such as irritable bowel syndrome. Consuming adequate fiber, drinking plenty of water, avoiding processed and high-fat foods, and becoming more physically active are simple methods of relieving constipation.

Home remedies for constipation:

  • Frequent, physical activity and exercise: Walking, housework, taking stairs instead of an elevator, gardening, swimming, dancing, bicycling, etc. Go for a walk or engage in 20 minutes of moderate activity after eating a meal.
  • Stay well hydrated: Water is always your best beverage. Drink several glasses of it each day. Prune, pineapple, and citrus juices with pulp, preferably freshly prepared, may also help, as well as, decaffeinated herbal teas, low-sodium broths, and soups. However, caffeinated beverages such as tea, coffee, energy drinks, and colas and alcoholic drinks which tend to dehydrate the body may actually reverse the desired effect by causing your body to lose water needed to soften stool.
  • Slowly increase your dietary fiber intake from fruits, vegetables, whole grains, nuts, and seeds, to aid the passage of stool: Foods that are natural laxatives include prunes, prune juice, melon, rhubarb, and papaya. Include some fiber with every meal and snack. Always increase fiber gradually to reduce bloating and gas. Make sure you drink more fluids, especially water, to flush the fiber through your system. Sprinkle All Bran® or All Bran Buds® (1-2 tablespoons), wheat bran (1-2 teaspoons) or psyllium husk (1-2 teaspoons) into pudding, yogurt, oatmeal, applesauce, or on top of your favourite cold cereal. Add to casseroles, fruit, vegetables, soups, meatloaf, mashed potatoes, baked goods etc.
  • Two types of dietary fiber help alleviate constipation:
    1. Soluble fiber: Dissolves easily in water, forming a gel-like substance that slows digestion, softens stools and improves elimination. Found in oatmeal, oat cereal, lentils, apples, oranges, pears, oat bran, strawberries, nuts, flaxseeds, beans, dried peas, blueberries, psyllium, cucumbers, celery, and carrots.
    2. Insoluble fiber: Does not dissolve in water, but passes directly through the digestive system very much intact. Insoluble fiber increases stool bulk, keeping bowel movements regular and eliminating constipation. Found in whole wheat, whole grains, wheat bran, corn bran, seeds, nuts, barley, couscous, brown rice, bulgur, zucchini, celery, broccoli, cabbage, onions, tomatoes, carrots, cucumbers, green beans, dark leafy vegetables, raisins, grapes, fruit, and root vegetable skins.
  • Allow sufficient, unrushed time to have a bowel movement when you have the urge to go.
  • Try to eat meals and snacks at the same time each day.
  • Fill half of your plate at each meal with fresh fruit and/or vegetables.
  • Minimize or avoid fast food, processed, salty, and high-fat foods, cold cuts, meat, cheese, and pastries.
  • Cut up fresh fruit for your breakfast cereal or have it for a snack or in place of dessert.
  • Stewed fruit compote: A natural remedy for constipation, as well as a delicious, sweet, syrupy, comfort food! For anyone returning home from a hospital stay which often slows down the digestive tract, a dried fruit compote can gently help to get their digestive system functioning again. Compotes are easy, quick to make, heart-healthy, fiber-rich, naturally sweet, versatile, and contain no saturated fat, cholesterol, sodium, or gluten. People of all ages, including children, love fruit compotes! (See “Delicious Dried Fruit Compote Recipes” at www.dianesays.com, Digestive Health category.)

What is Power Pudding?

Sometimes following the standard medical recommendations to drink plenty of water, increase dietary fiber, and exercise are not enough to prevent or cure constipation. Power Pudding is an old home remedy used to relieve constipation and improve bowel function in the elderly and people whose medications cause constipation. Regular use of it can help prevent chronic constipation.

The following recipe for Power Pudding is simple and very effective for alleviating constipation. It promotes regular bowel function by increasing dietary fiber and should help to soften and regulate your bowel movements within 2 weeks. Begin with 1 or 2 tablespoons each morning or evening mixed with, or followed by, an 8-oz glass of water or juice. If no change occurs, slowly increase the serving to 3-4 tablespoons. Try to make this a part of your daily routine. While you may experience bloating, cramping, or gas during the first week of Power Pudding use, these side effects should diminish. Avoid regular use of laxatives and enemas, as they decrease the ability of your bowel to function normally.

Power Pudding Recipe: Blend together the following ingredients:

  • 1 cup applesauce
  • 1 cup coarse, unprocessed oat bran or unprocessed wheat bran (You may substitute “All Bran” or “Raisin Bran” cereal for oat or wheat bran.)
  • 1 cup prune juice or stewed prunes
  • Ground cinnamon if desired
  1. The mixture will be naturally sweet without adding any sugar and have a pasty, stiff, thick consistency like peanut butter. If it seems too dry, just add more applesauce, orange juice, or prune juice.
  2. Cover and store in refrigerator for up to 1 week. You can also freeze 1-2 tablespoon servings in sectioned ice cube trays and thaw as needed.
  3. While dietary fiber helps to alleviate constipation, eating too much too quickly may cause the above side effects. Always introduce prunes, stewed fruit compotes, and other sources of fiber slowly to your diet and in small amounts to avoid any digestive discomfort, and increase your water intake to help flush the fiber through your system.

Disclaimer:

Talk with your doctor before using Power Pudding for constipation. This document is not intended to replace the care and attention of your personal physician or other professional medical services. Contact your doctor if you continue to have constipation, have questions about individual health concerns or specific treatment options.

Reference:

“Delicious Dried Fruit Compote Recipes.”  Digestive Health/Heart-Healthy categories: www.dianesays.com.

{ Comments on this entry are closed }

Dried fruit compote is a natural remedy for constipation, as well as a delicious, sweet, syrupy, comfort food! For anyone returning home from a hospital stay which often slows down the digestive tract, a fruit compote can gently help to get their digestive system functioning again. Compotes are also a great way of satisfying your sweet tooth with something nutritious. They are easy, quick to make, heart-healthy, fiber-rich, naturally sweet, versatile, and contain no saturated fat, cholesterol, sodium, or gluten. People of all ages, including children, love fruit compotes!

Ways to enjoy a dried fruit compote:

  • By itself for breakfast, as a snack, or dessert
  • As a topping for cereal or oatmeal
  • Topped with vanilla yogurt
  • As a topping over fresh fruit such as pears or apples for a healthy dessert
  • As a spread for toast
  • Served cold with plain yogurt, or warm with ice cream, and nuts on top
  • With thick coconut milk and chopped nuts on top

Cooked compote may be stored in your refrigerator for up to 2 weeks and will improve in flavor. One to two-tablespoon servings may be frozen in sectioned ice cube trays and thawed as needed. Make the following recipes with any dried fruit available. Don’t worry about being exact with the amounts listed. The compotes will be delicious and nourishing with any combination of dried fruits:

A. Prunes Stewed in Water:

  1. Place 2 cups of pitted prunes in a medium pot.
  2. Add 2 ½ cups of cold water and heat the prunes and water on a medium-high flame.
  3. Once the water starts boiling, lower the heat to a simmer for about 25 minutes.
  4. When prunes have become soft and tender, remove pot from heat and allow stewed prunes to cool.

B. Stewed Prunes with Lemon and Cinnamon (8 servings):

  1. Cover 1 lb. pitted prunes with cold water in a saucepan.
  2. Bring to a boil, then reduce heat and simmer gently about 20 minutes.
  3. If desired, add 1/4 cup sugar (optional).
  4. Cook 10 minutes longer, stirring to dissolve sugar, if added. During this time, add 1/2 lemon, sliced, and 1 cinnamon stick.
  5. Remove pan from heat and allow prunes to cool.
  6. Serve warm or chilled.

C. Stewed Prunes with Lemon Juice:

  1. Place 1 cup of pitted prunes in a saucepan and pour 1½ cups of water into it.
  2. Add 1 tablespoon or more of lemon juice and bring the mixture to a boil.
  3. Reduce heat and simmer for about 20-25 minutes. Remove from heat.
  4. Allow to cool and garnish with lemon slices.

D. Prunes Stewed in Orange Sauce (20 minutes to prepare/cook):

  • 1 cup orange juice, preferably fresh squeezed
  • 1 tablespoon fresh lemon juice
  • 1 teaspoon grated or minced lemon zest
  • 1/4 cup honey
  • 1/2 teaspoon ground cinnamon
  • 1/4 cup chopped walnuts (chopped almonds, hazelnuts, pecans, peanuts, etc., may be substituted)
  • 24 pitted prunes
  1. Combine orange and lemon juices, lemon zest, honey, and cinnamon in a medium saucepan. Bring to a simmer on high heat and add prunes.
  2. Turn the heat as low as possible and cover. Simmer gently for only about 10 minutes. Avoid letting prunes get soggy.
  3. Add chopped walnuts and cook for another few minutes.
  4. Remove prunes with a slotted spoon and turn the heat to medium-high; reduce the liquid to about half. Pour the syrup over the prunes and chill or serve warm.
E. Apricot Compote (15 minutes to prepare/cook 2 cups):
  • 2 tablespoons fresh lemon juice
  • 1 1/2 cups fresh orange juice
  • 2 tablespoons honey
  • 1 cup dried apricots, sliced
  • 1/2 cup raisins
  • 1/2 cup chopped walnuts
  1. In a small saucepan, bring the lemon juice, orange juice and honey to a boil.
  2. Add apricots and raisins.
  3. Reduce heat to low and simmer just until they become tender and a little syrupy, about 10 minutes. Do not overcook, or they will become soggy and dissolve. Keep fruit well-defined.
  4. Remove apricots and raisins with a slotted spoon and reduce sauce for about 2 minutes to thicken.
  5. Remove from heat and add apricots, raisins, and walnuts back to sauce. Serve warm or chilled.

F. American Heart Association (AHA) Mixed Dried Fruit Compote:

  1. In a small saucepan, combine 1 cup chopped dried fruits, such as apricots, prunes, or peaches, or a combination, with 1/2 cup dried cranberries or raisins.
  2. Add water to cover. Simmer, covered, for 20 minutes.
  3. Drain and let cool slightly.

(Calories 90; protein 2 g; carbohydrates 20 g; cholesterol 0 mg; total fat 1 g; saturated fat 0 g; polyunsaturated fat 0 g; monounsaturated fat 0 g; fiber 2 g; sodium 76 mg)

G. Sweet Dried Fruit Medley Compote (Yield: 4 cups)

Total time: 1 hr 55 min (Prep: 10 min; Soak: 1 hr; Cook: 45 min)

  • 4 cups water, divided into 2 containers
  • 8 ounces dried fruit (dried apples, apricots, dates, figs, pears, prunes, raisins)
  • 1/2 cup orange juice, freshly squeezed
  • 4 ounces sugar, approximately 1/2 cup (optional)
  • 1 lemon, zested
  • 1 cinnamon stick
  • 1 whole clove
  1. Combine 2 cups of water with dried fruit in a large bowl. Let soak for 1 hour.
  2. In a small saucepan, combine remaining 2 cups of water, orange juice, sugar, and lemon zest over medium-high heat. Add fruit and soaking liquid to pan. Bring to a boil, stirring occasionally. Reduce heat to medium-low and add cinnamon and clove.
  3. Simmer 40 minutes, stirring occasionally, until fruit has softened and mixture has thickened. Remove from the heat and set aside to cool. Serve warm or cold.

Note: If using store bought dried fruit, chop the pieces into 1/2-inch chunks and simmer the mixture an additional 15 to 20 minutes.

H. Dried Fruit Medley Compote with Bran
  • 1/2 cup dried prunes
  • 1/2 cup dried apricots
  • 1/2 cup dried figs, raisins, pitted dates, cherries, apples, pears, peaches, or mango
  • 1/2 lemon, sliced with rind on for flavor
  • 1/2 orange, sliced with rind on for flavor
  • 1/4 cup bran
  • 1 cinnamon stick (remove after cooking)
  • Enough water to cover all the fruit, plus another inch of water (or use 1/2 water and 1/2 orange juice, or all orange juice for extra sweetness).
  1. Combine dried fruits and cinnamon stick in a saucepan large enough to allow space for expansion of fruits.
  2. Cover with water or juice, plus another inch of water or juice, since the dried fruit will absorb a lot of liquid.
  3. Bring to a boil. Reduce heat and simmer for 20-30 minutes, until the fruit is soft and the liquid has become a sweet syrup.
  4. Refrigerate once compote has cooled.
While eating prunes or a stewed fruit compote helps to alleviate constipation, eating too much too quickly may cause side effects, such as stomach cramping, bloating, gas, and possibly diarrhea. Always introduce prunes, fruit compotes, and other sources of fiber slowly to your diet and in small amounts to avoid any discomfort, and drink plenty of water.

Disclaimer:

This information is not intended to replace the care and attention of your personal physician or other professional medical services. Talk with your doctor if you continue to have constipation or have questions about individual health concerns and specific treatment options.

{ Comments on this entry are closed }